By: Team SE-EDU Since: Jun 2016 Licence: MIT
1. Setting up
Refer to the guide here.
2. Design
2.1. Architecture
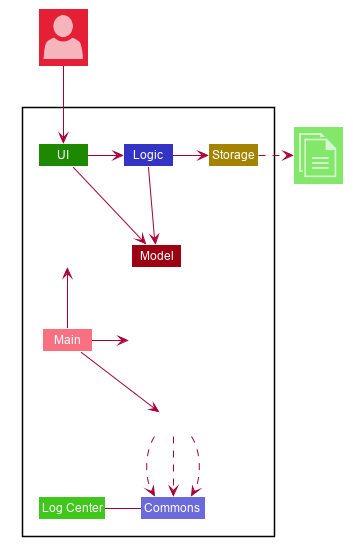
The Architecture Diagram given above explains the high-level design of the App. Given below is a quick overview of each component.
The .puml files used to create diagrams in this document can be found in the diagrams folder.
Refer to the Using PlantUML guide to learn how to create and edit diagrams.
|
-
At app launch: Initializes the components in the correct sequence, and connects them up with each other.
-
At shut down: Shuts down the components and invokes cleanup method where necessary.
Commons represents a collection of classes used by multiple other components.
The following class plays an important role at the architecture level:
-
LogsCenter: Used by many classes to write log messages to the App’s log file.
The rest of the App consists of four components.
Each of the four components
-
Defines its API in an
interfacewith the same name as the Component. -
Exposes its functionality using a
{Component Name}Managerclass.
For example, the Logic component (see the class diagram given below) defines it’s API in the Logic.java interface and exposes its functionality using the LogicManager.java class.
How the architecture components interact with each other
The Sequence Diagram below shows how the components interact with each other for the scenario where the user issues the command delete 1.
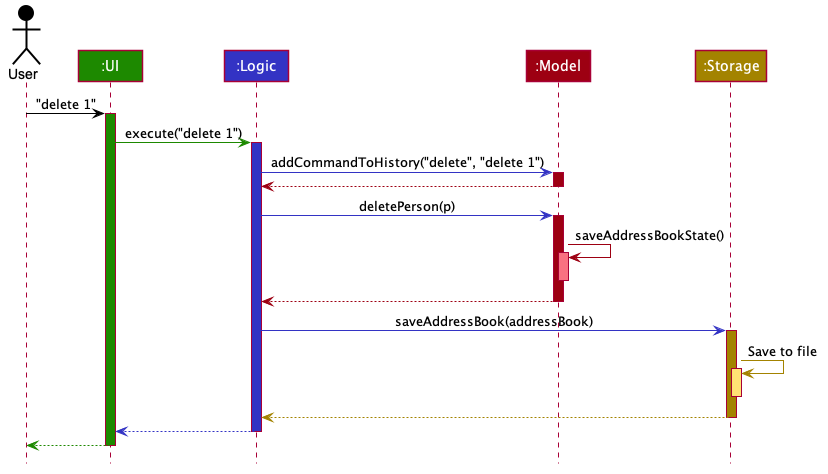
delete 1 commandThe sections below give more details of each component.
2.2. UI component
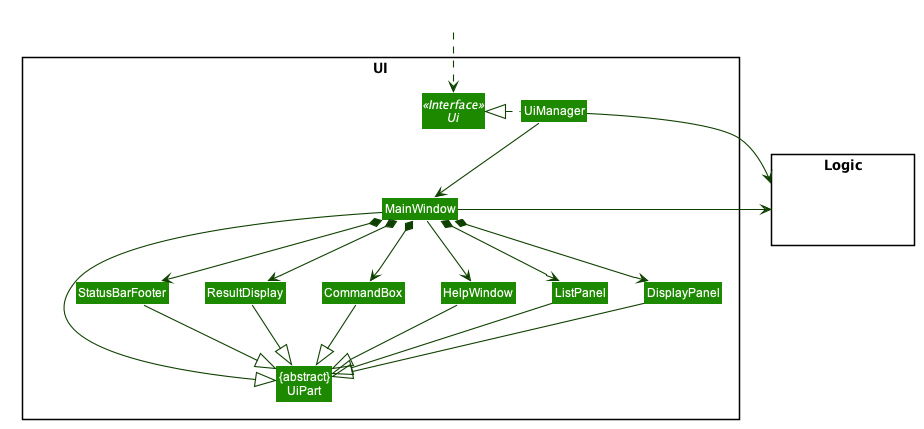
API : Ui.java
The UI consists of a MainWindow that is made up of parts e.g.CommandBox, ResultDisplay, PersonListPanel, StatusBarFooter etc. All these, including the MainWindow, inherit from the abstract UiPart class.
The UI component uses JavaFx UI framework. The layout of these UI parts are defined in matching .fxml files that are in the src/main/resources/view folder. For example, the layout of the MainWindow is specified in MainWindow.fxml
The UI component,
-
Executes user commands using the
Logiccomponent. -
Listens for changes to
Modeldata so that the UI can be updated with the modified data.
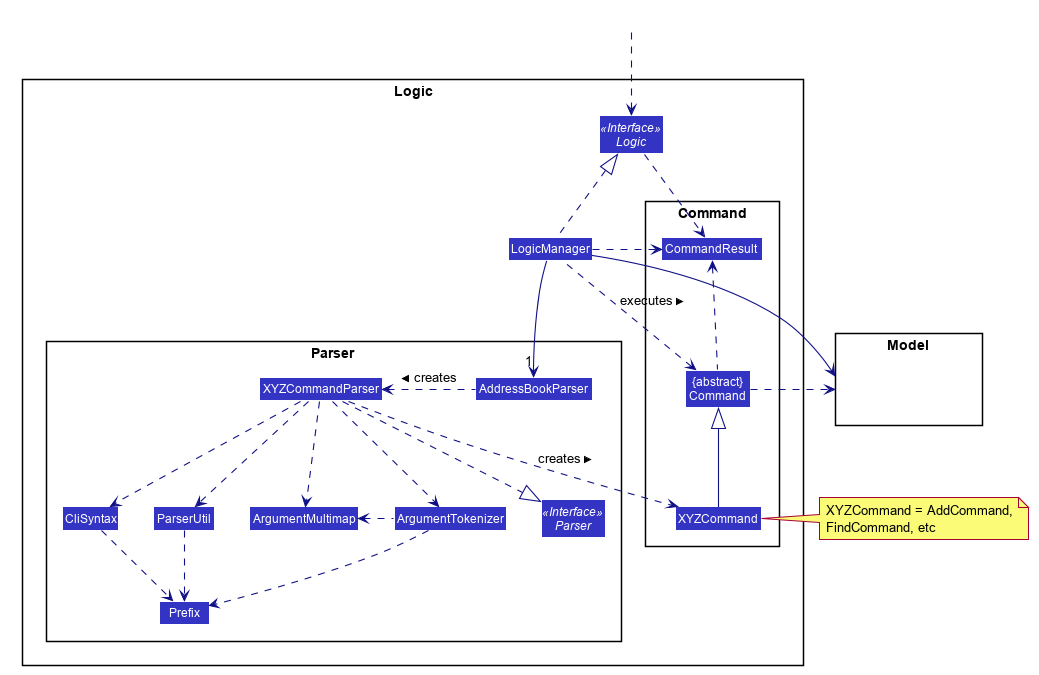
2.3. Logic component
API :
Logic.java
-
Logicuses theAddressBookParserclass to parse the user command. -
This results in a
Commandobject which is executed by theLogicManager. -
The command execution can affect the
Model(e.g. adding a person). -
The result of the command execution is encapsulated as a
CommandResultobject which is passed back to theUi. -
In addition, the
CommandResultobject can also instruct theUito perform certain actions, such as displaying help to the user.
Given below is the Sequence Diagram for interactions within the Logic component for the execute("delete 1") API call.

delete 1 Command
The lifeline for DeleteCommandParser should end at the destroy marker (X) but due to a limitation of PlantUML, the lifeline reaches the end of diagram.
|
2.4. Model component
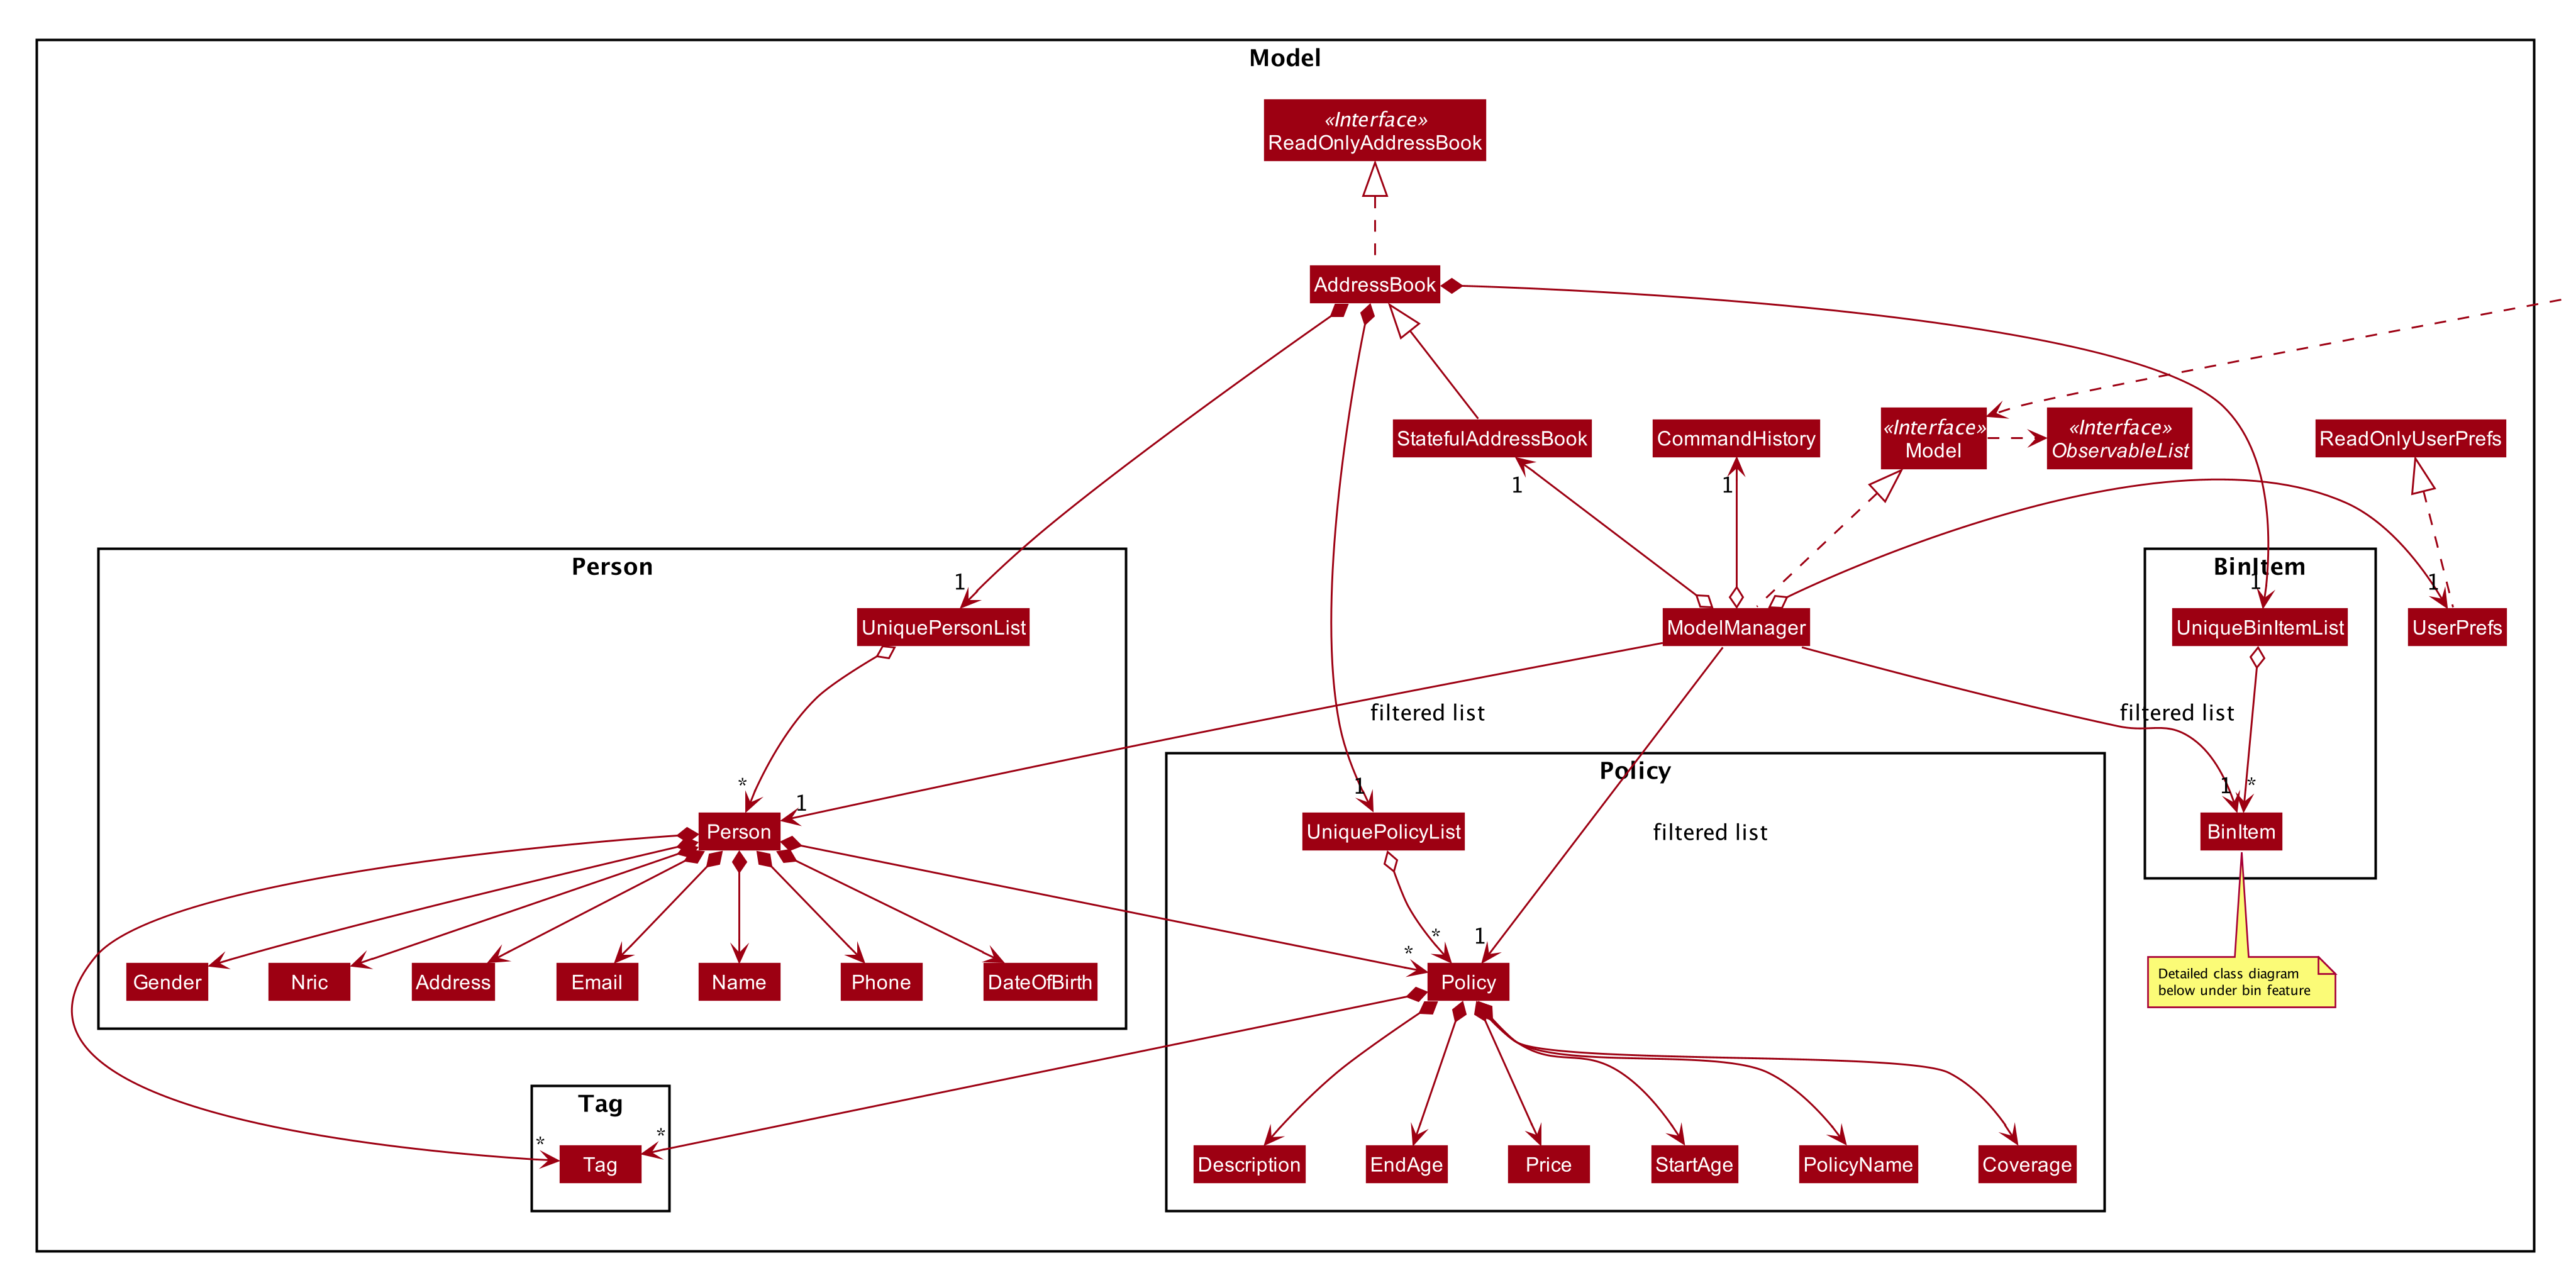
API : Model.java
The Model,
-
stores a
UserPrefobject that represents the user’s preferences. -
stores the Address Book data, in the form of a stateful address book which maintains a list of address books as states.
-
stores the list of previously entered commands, in the form of a
CommandHistoryobject. -
exposes an unmodifiable
ObservableList<Person>andObservableList<Policy>that can be 'observed' e.g. the UI can be bound to this list so that the UI automatically updates when the data in the list change. -
does not depend on any of the other components.
As a more OOP model, we can store a Tag list in Address Book, which Person can reference. This would allow Address Book to only require one Tag object per unique Tag, instead of each Person needing their own Tag object. An example of how such a model may look like is given below.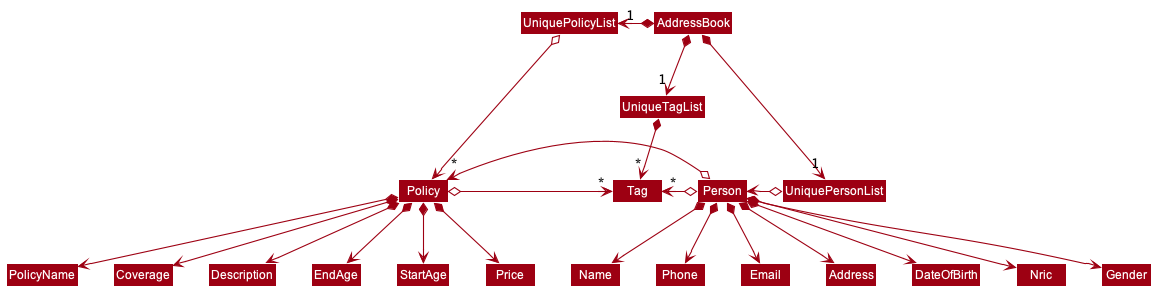
|
2.5. Storage component
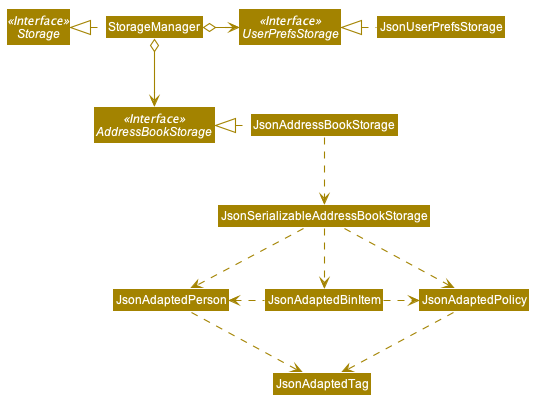
API : Storage.java
The Storage component,
-
can save
UserPrefobjects in json format and read it back. -
can save the Address Book data in json format and read it back.
2.6. Common classes
Classes used by multiple components are in the seedu.addressbook.commons package.
3. Implementation
This section describes some noteworthy details on how certain features are implemented.
3.1. Merging Feature
3.1.1. Implementation
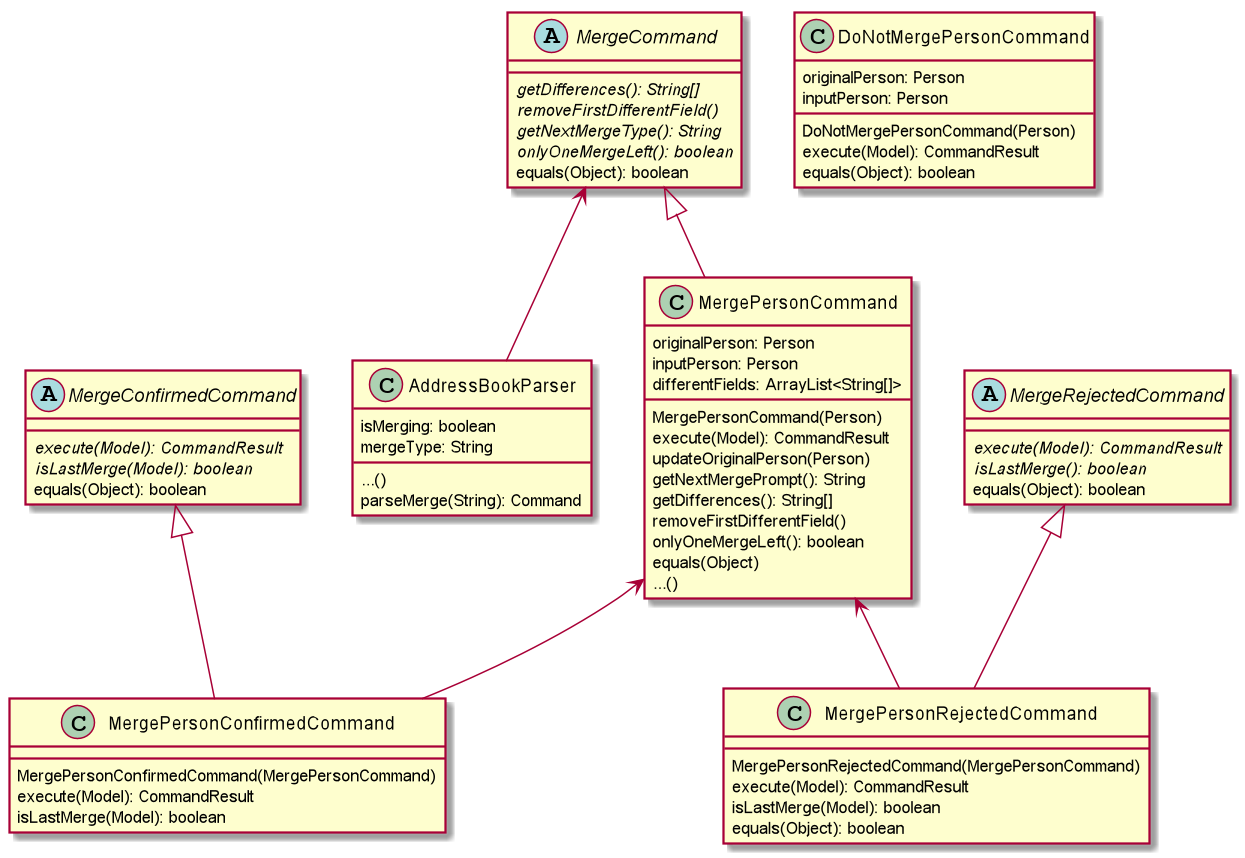
The merging mechanism is facilitated by abstract classes MergeCommand, DoNotMergeCommand, MergeConfirmedCommand and MergeRejectedCommand and their child classes, which implement the merging of profiles and policies respectively.
These classes extend Command. The child classes of MergeCommand are MergePersonCommand and MergePolicyCommand. A MergePersonCommand object will store the Person created by the input and the corresponding Person that is stored in the model.
Additionally, the main crucial operations implemented by this class are:
-
MergeCommand#getDifferences()— Finds all the different fields between the input person and the original person. -
MergeCommand#removeFirstDifferentField()— Removes the first different field in the list of differences. This method is called after a merge decision has been input by the user and executed. -
MergeCommand#getNextMergeFieldType()— Returns the type of the field for the next merge. -
MergeCommand#onlyOneMergeLeft()— Checks whether there is only one merge left.
The implementation of MergePolicyCommand is similar.
The child classes of MergeConfirmedCommand are MergePersonConfirmedCommand and MergePolicyConfirmedCommand, while the child classes of MergeRejectedCommand are MergePersonRejectedCommand and MergePolicyRejectedCommand.
They all implement #execute(Model). Additionally, these classes implement an #isLastMerge() command to indicate if this is the last possible merge for the entity being merged.
AddressBookParser stores a boolean flag to indicate whether a merge is currently taking place. When it is set as true, all other commands will not be parsed and will be treated as invalid commands.
The AddressBookParser object also stores the MergeCommand object during a merge process. This object is then used by MergeConfirmedCommand objects and MergeRejectedCommand objects in their execution.
Given below is an example usage scenario and how the merge mechanism behaves at each step.
Step 1. The user adds a duplicate profile. The AddCommand will throw a DuplicatePersonWithMergeException during its execution.
This exception is thrown if there is at least one different field between the input person and the original person stored in the model. Else, a DuplicatePersonWithoutMergeException will be thrown.
The DuplicatePersonWithMergeException will finally be caught in the CommandBox. UI outputs the error message and a prompt to start a merge. CommandBox then constructs two command strings: one to proceed with the merge and one to reject the merge.
This is done via #standByForMerge(String, String). This string is then stored.
Step 2. The user inputs yes or presses enter to proceed with the merge. CommandBox then calls CommandExecutor#execute() to execute the merge command it constructed previously.
When the command is being parsed in the AddressBookParser object, a new MergeCommand object is created and stored. The isMerging flag is also set to true.
The execution of this command then returns a CommandResult that prompts the next merge.
Step 3. The user inputs yes or presses enter to update the field that was displayed in the prompt. The AddressBookParser parses the input and creates a new MergePersonConfirmedCommand object.
The MergePersonConfirmedCommand object obtains information for the merge from the MergeCommand object that was passed in as a parameter in the constructor.
In the execution, a new EditCommand is created and EditCommand#executeForMerge() is used to update the person in the model. If the
MergePersonConfirmedCommand#isLastMerge returns false, MergeCommand#removeFirstDifferentField is called and the command result then shows a success message and the next prompt.
This process is shown in the sequence diagram below.
| If the user inputs an invalid command, the prompt will be displayed again along with an error message. |
Step 4. The user inputs no to reject the update of the field that was displayed in the prompt. The input gets parsed in the AddressBookParser object and creates a new MergePersonRejectedCommand.
If it is not the last merge, MergeCommand#removeFirstDifferentField is called. The command result then shows the next prompt. Else, it will show a success message of successfully updating the profile.
This is repeated until all merges have been prompted.
3.1.2. Design Considerations
Aspect: How merge command executes
-
Alternative 1 (current choice): Stores the
MergeCommandobject in theAddressBookParserto be accessed byMergeConfirmedCommandandMergeRejectedCommandobjects.-
Pros: Finding of different fields is only executed once and can be used by future commands.
-
Cons: More coupling between
MergeCommandand other classes.
-
-
Alternative 2: Update the field in the command string and pass it on in the command result.
-
Pros: Less coupling between
MergeCommandand other classes. -
Cons:
-
User has to see the updated command (information that user does not need to see is displayed).
-
Command still has to be stored somewhere to be accessed by other future merge commands.
-
-
3.2. Display Feature
3.2.1. Implementation
The display mechanism follows the Model-View-Controller design pattern. The model is facilitated by the AddressBook
instance, which provides the data the controller needs.
The controller is facilitated by an abstract class DisplayController, which extends UIPart<Region>.
Every supported format controller extends this abstract class.
The following class diagram shows the OOP solution for display:

Every controller needs to support every indicator. In the event a controller cannot display a particular
indicator, it will throw a parseException error, which provides suggestions of which visual controllers are supported
by the particular indicator.
|
The view is facilitated by the associated FXML. These views share a common CSS, and also have their individual CSS file.
Given below is an example usage scenario and how the display mechanism behaves at each step.
Step 1. The user executes the display i/policy-popularity-breakdown f/barchart command to display the policy
popularity breakdown indicator in bar chart format. The execution of a display command determines
what will be shown (displayIndicator) and how it will be shown (displayFormat).
Step 2. displayFormat specifies that the controller BarChartController will be instantiated.
Step 3. The BarChartController initialises all the attributes of its associated FXML in its construction.
Let us take a closer look at the initialisation of the series attribute. The controller utilises the display
indicator policy-popularity-breakdown to retrieve the data in the model it needs. The controller
then casts the model’s data type to the data type supported by bar charts. The result is assigned to series attribute.
The following sequence diagram shows the interaction between UI, Controller and Model for steps 2 and 3:
Step 4. The bar chart controller then sets all the attributes of its associated FXML.
Step 5. Finally, the MainWindow calls DisplayController#getRoot() and displays the view.
The following activity diagram summarizes what happens when a user executes the display command:
3.2.2. Design Considerations
Aspect: How should controllers interact with model
-
Alternative 1 (current choice): Within controllers (by passing
logic, which accesses the model, as an argument to the instantiation of a controller.)-
Pros: Every controller handles their own interaction with the model.
-
Cons: Inconsistent with current implementation (alternative 2).
-
-
Alternative 2: Within
MainWindow-
Pros: Consistent with current implementation
-
Cons: The controllers are fully dependent on
MainWindowfor the data from the model. This entails that
-
Aspect: OOP solution for visual controllers
-
Alternative 1 (current choice): Display controllers to extend from abstract class
DisplayController-
Pros:
-
Allows display controller subclasses to share code. (refer to class diagram above)
-
Subclasses have many common methods (
initIndicators(Logic))
-
-
-
Alternative 2: Display controllers to implement interface
DisplayController-
Pros: Satisfies the can-do relationship of an interface.
-
Cons: Restricted to public access modifiers. This violates Law of Demeter.
-
3.3. Bin Feature
3.3.1. Implementation
The bin feature is facilitated by BinItem, UniqueBinItemList classes and the interface Binnable. Objects that
can be "binned" will implement the interface Binnable. When a Binnable object is deleted, it is wrapped in a
wrapper class BinItem and is moved into UniqueBinItemList.
The follow class diagram shows how bin is implemented.
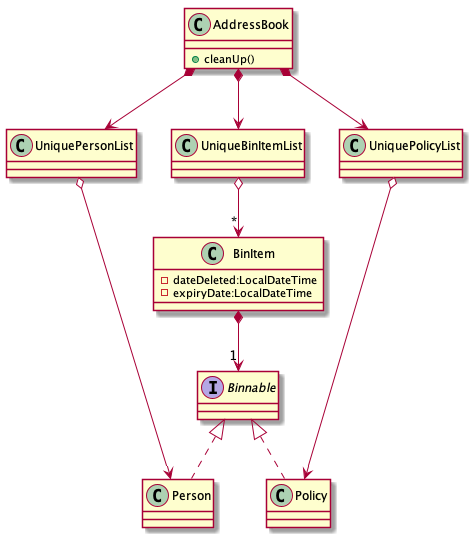
BinItem has 2 key attributes that is wrapped on top of the Binnable object, namely: dateDeleted and expiryDate.
Objects in the bin stays there for 30 days, before it is automatically deleted forever. Both attributes are used in the
auto-deletion mechanism of objects in the bin.
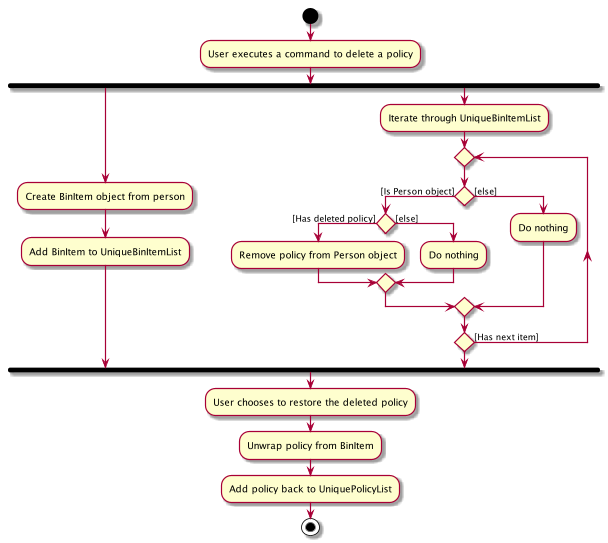
Given below is an example usage scenario and how the bin mechanism behaves at each step.
Step 1. When the user launches Insurelytics, ModelManager will run ModelManager#binCleanUp(), which will check the
expiryDate of all objects in UniqueBinItemList against the system clock. If the system clock exceeds expiryDate,
UniqueBinItemList#remove() is called and deletes the expired object forever.
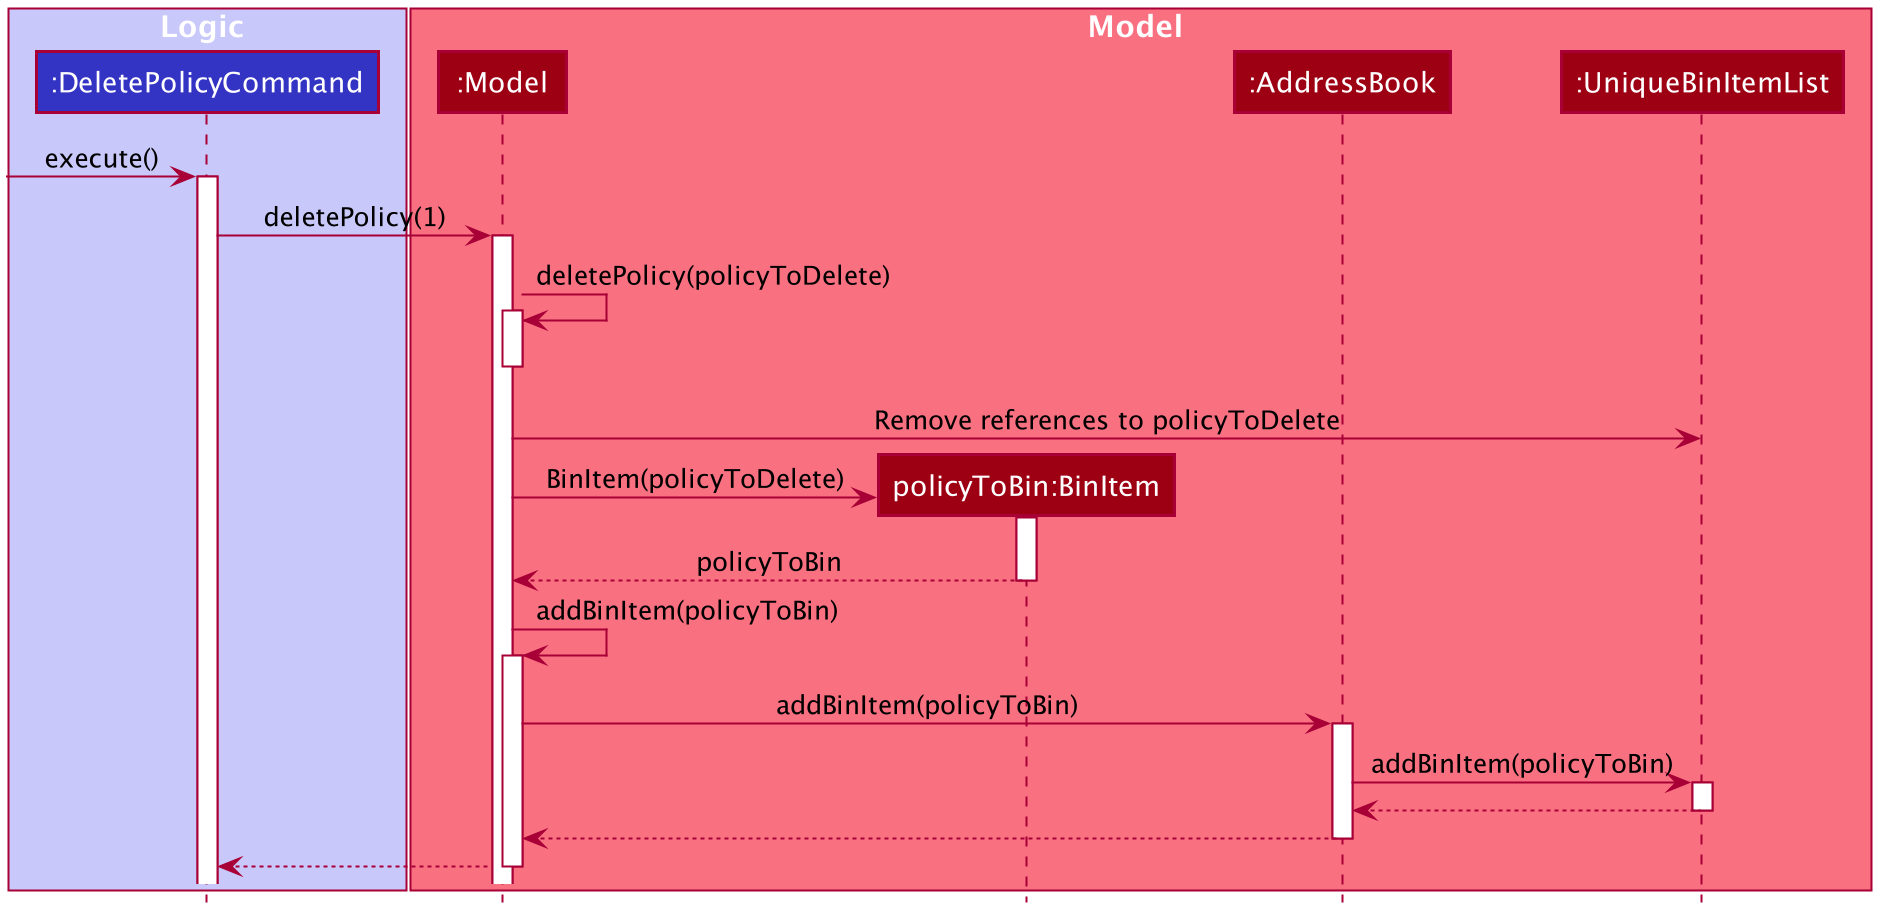
Step 2. The user executes deletepolicy 1 command to delete the first policy in the address book. The deletepolicy
command calls the constructor of BinItem with the deleted policy to create a new BinItem object. At this
juncture, the attribute dateDeleted is created, and expiryDate is generated by adding TIME_TO_LIVE to
dateDeleted. At the same time, references to the policy that was just deleted will also be removed from any BinItem
that has them.
Removing references of deleted policies in items inside the bin only happens for deletepolicy. Removing of
references does not happen for deleted persons, since policies don’t keep track of the persons that bought them.
|
Step 3. The deletepolicy command then calls Model#addBinItem(policyToBin) and shifts the newly created BinItem to
UniqueBinItemList.
The following sequence diagram shows how a deletepolicy operation involves the bin.
Step 4. The user quits the current session and starts a new session some time later. He/she then realises that he/she
needs that contact that was deleted and wants it back, so he/she executes restore 1 to restore the deleted person
from the bin.
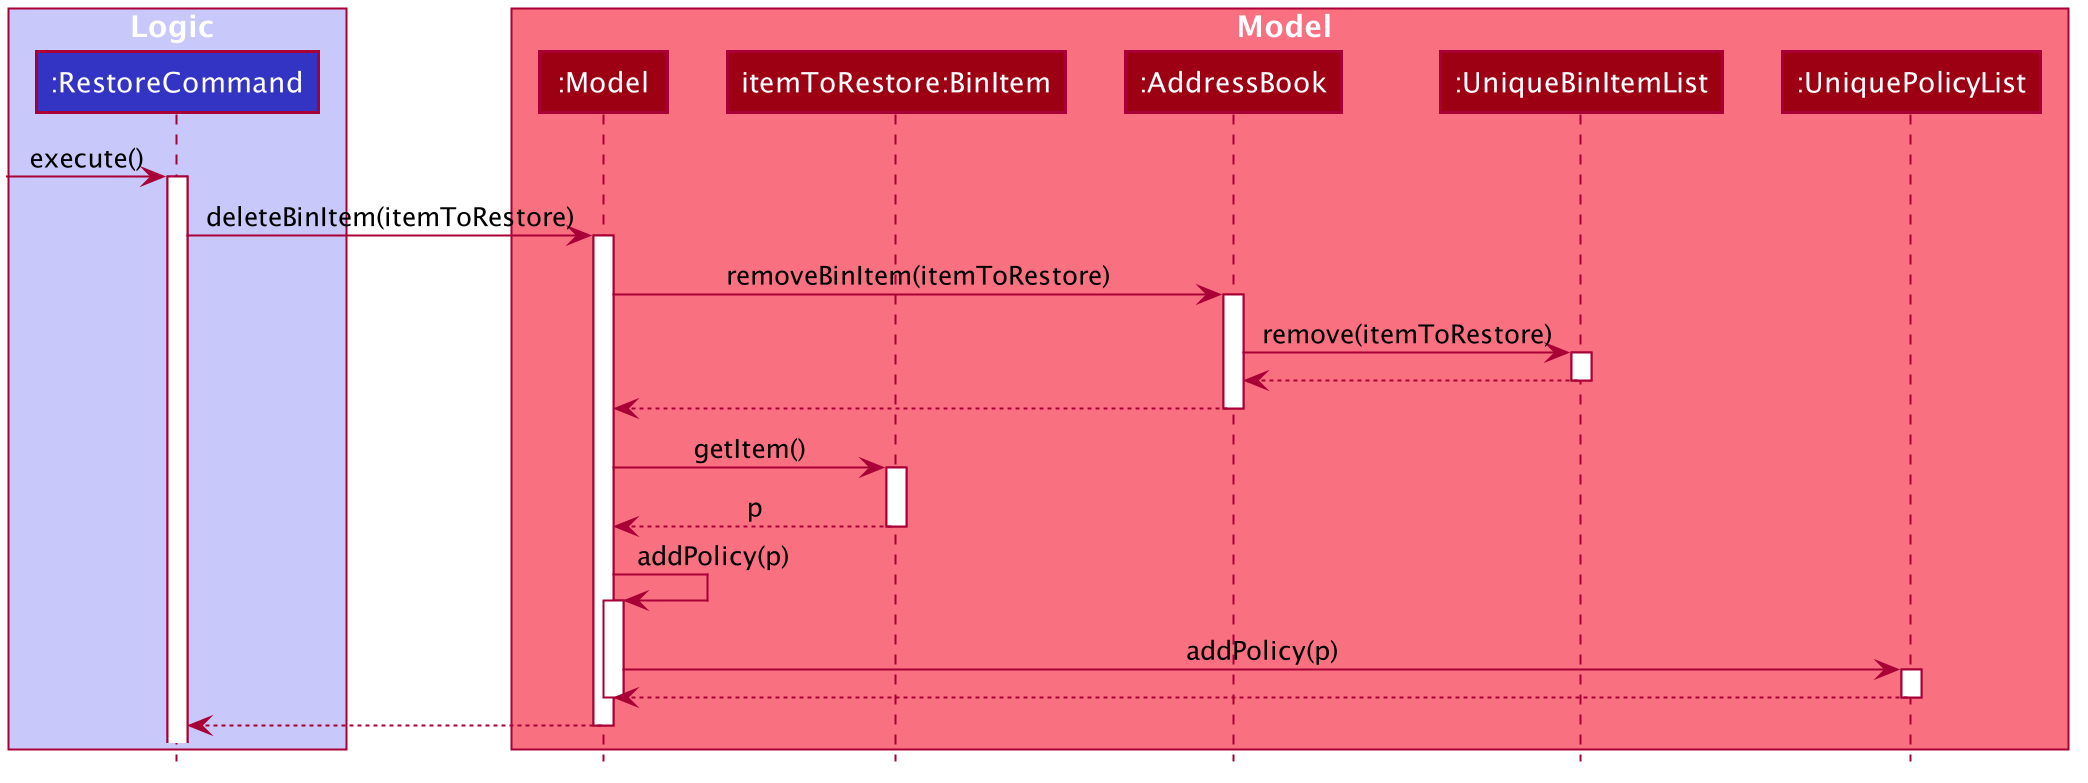
Step 5. The restore command then calls Model#deleteBinItem(itemToRestore), which removes itemToRestore from
UniqueBinItemList. The wrapper class BinItem is then stripped and the internal policy item is added back to
UniquePolicyList.
The following sequence diagram shows how a restore command operates.
The following activity diagram summarizes the steps above.
3.3.2. Design Considerations
Aspect: Which part of the architecture does Bin belong
-
Alternative 1 (current choice): As part of AddressBook
-
Pros: Lesser repeated code and unnecessary refactoring. Other features at the AddressBook level such as undo/redo will not be affected with a change/modification made to Bin as it is not dependent on them.
-
Cons: From a OOP design point of view, this is not the most direct way of structuring the program.
-
-
Alternative 2: Just like AddressBook, as part of Model
-
Pros: More OOP like and lesser dependencies since Bin is extracted out from AddressBook. Methods related to bin operations are called only from within Bin.
-
Cons: Many sections with repeated code since it is structurally similar to AddressBook.
-
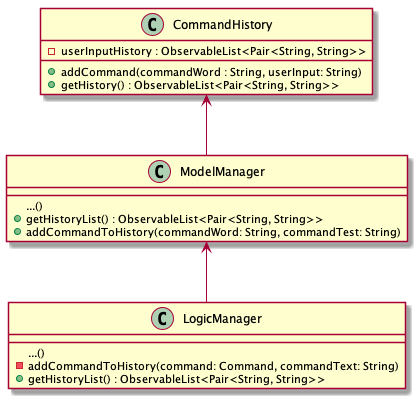
3.4. Command History Feature
3.4.1. Implementation
To allow users to view the list of previously entered commands, a command history mechanism is implemented, which
lists down all the previous commands entered by the user from the point of starting the application. This feature
can be accessed using the history command, and it does not show invalid commands or the commands which were autocorrected
into valid ones. The feature is supported by the CommandHistory class, an instance of which is stored as one of the
memory objects inside ModelManager. The main operations implemented by this class are:
-
addCommand(commandWord, commandText)— Adds the command with the command wordcommandWordand full command textcommandTextinto the list of previously entered commandsuserInputHistory. -
getHistory()— Reverses the list of previously entered commands and returns it.
The history view is accompanied by its associated HistoryCard and HistoryListPanel FXML. These views share a common CSS
with other FXML files.
Given below is an example usage scenario and how the command history mechanism works at each step.
Step 1. The user enters the history command to display the list of previously entered commands, starting from
the most recent. This results in HistoryCommand::execute() returning a CommandResult with the listHistory attribute
set as true.
Step 2. The CommandResult object is then passed into MainWindow through LogicManager.
Step 3. The MainWindow creates a new HistoryListPanel object with the list of commands as logic.getHistoryList().
Following is the sequence diagram that shows the interaction between different components of the app when the command
history is typed in by the user:
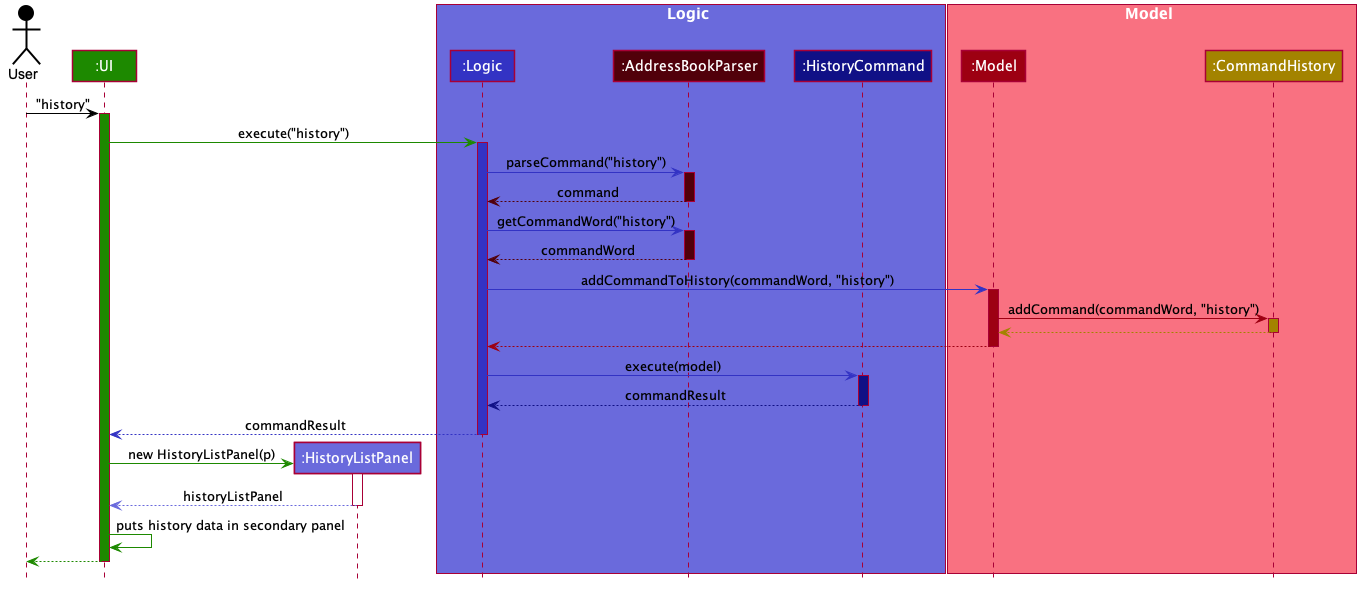
Step 4. The HistoryListPanel object then initialises all the attributes of the associated FXML object, following which this
component is placed in the secondary panel display.
Step 5. Finally, the MainWindow calls StackPane::getChildren::add to add HistoryListPanel::getRoot to place the
history list panel into the secondary display screen.
3.4.2. Design Considerations
Aspect: Where to store the CommandHistory object
-
Alternative 1: Place the
CommandHistoryobject directly in theLogicManagerclass-
Pros: Since the user input is being parsed in
LogicManager, storing the command history ensures that data is not being passed around between theLogicManagerand theModelManager. -
Cons: By right the
LogicManageris only concerned with handling logic, any data storage should be performed inModelManager. Storing command history here would violate Single Responsibility Principle and Separation of Concerns.
-
-
Alternative 2 (current choice): Place the
CommandHistoryobject in model manager, parse user input inLogicManagerand pass it toModelManager.-
Pros: Separation of concerns and Single Responsibility Principle for
LogicManagerandModelManageris maintained. -
Cons: Increases coupling between
LogicManagerandModelManager, thereby violating the Law of Demeter.
-
Aspect: Which commands to display in command history
-
Alternative 1: Display only those commands which will be relevant to user if she is considering undo/redo (therefore, display only data changes)
-
Pros: Only commands which are more relevant shown to user.
-
Cons: Which commands are relevant depends on the user, moreover limits the application of command history feature to undo/redo application.
-
-
Alternative 2: Display every valid command entered by the user
-
Pros: More accurate representation of command history, every command entered is a part of the history
-
Cons: Clutters the command history with unnecessary commands like
historyandundo.
-
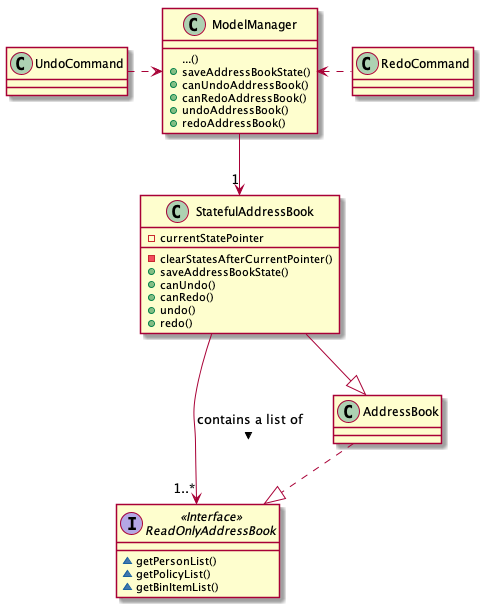
3.5. Undo/Redo Feature
3.5.1. Implementation
To allow users to revert/return to a previous/future state of the address book, an undo/redo mechanism is implemented, which
undoes/redoes the last data change made in the application. This feature can be performed using the undo or redo
command, and it performs an undo or a redo only when possible. The feature is supported by the StatefulAddressBook class,
an instance of which is stored as one of the memory objects inside ModelManager. The main operations implemented by this class are:
-
StatefulAddressBook#saveAddressBookState()— Adds an address book with the current state to the liststatefulAddressBookList. Also clears states after thecurrentStatePointerand updates it by one. -
StatefulAddressBook#undo()— Reverts thecurrentStatePointerto the previous one, and resets the address book to use the one pointed bycurrentStatePointer. -
StatefulAddressBook#redo()— Increments thecurrentStatePointerto the future one, and resets the address book to use the one pointed bycurrentStatePointer.
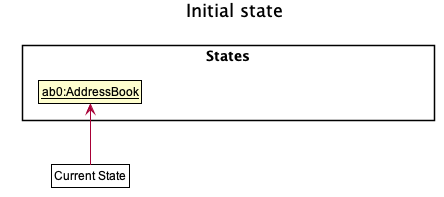
Given below is an example usage scenario and how the undo-redo mechanism works at each step. Let us assume that StatefulAddressBook has just been initialised.
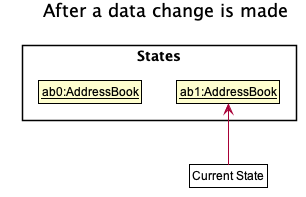
Step 1. The user makes some data changes. This adds a list of states to our StatefulAddressBook, and updates the
currentStatePointer.
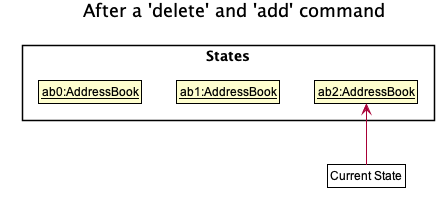
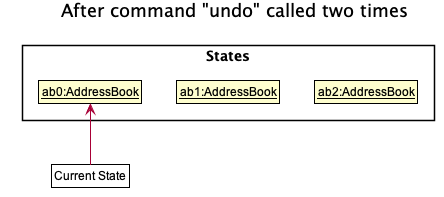
Step 2. User types undo. This invokes the UndoCommand::execute method, which further invokes the StatefulAddressBook::undo
method. The currentStatePointer is decremented, and the address book is reset to the one being pointed to by
currentStatePointer.
Step 3a. The use can perform another data change, following which states after currentStatePointer are erased,
and a new state is added.
Step 3b. If a command which does not perform a data change is called, nothing happens in the StatefulAddressBook.

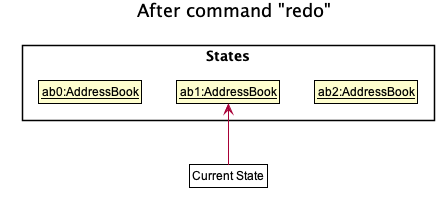
Step 3c. If a redo() is called, then the currentStatePointer is incremented, and the address book is reset to the one
being pointed to by currentStatePointer.
Step 4. If the address book data is reset to another state’s, then all the data inside the application is reloaded, with the resulting changes now reflected.
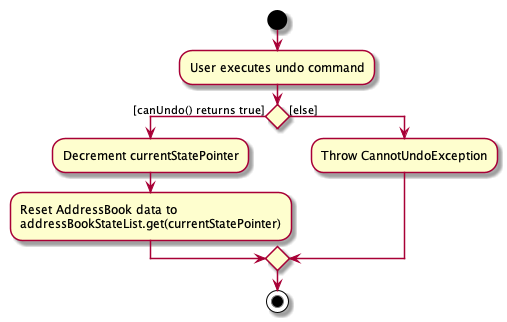
Following is an activity diagram which shows the execution when the user makes in a data change or types in the undo
command. The diagram for a redo command will be similar.
3.5.2. Design Considerations
Aspect: How undo & redo executes
-
Alternative 1 (current choice): Saves the entire address book.
-
Pros: Easy to implement, takes way lesser code.
-
Cons: May have performance issues in terms of memory usage.
-
-
Alternative 2: Individual command knows how to undo/redo by itself.
-
Pros: Will use less memory (e.g. for delete, just save the person being deleted).
-
Cons: We must ensure that the implementation of each individual command are correct.
-
-
Alternative 3: Do not store entire address book, but a PersonList, PolicyList and BinList depending on what is changed.
-
Pros: Will use less memory (e.g. for delete, just save the person list).
-
Cons: We must ensure that the implementation of each individual command are correct. Several cases to consider when we try to undo a command.
-
Aspect: Data structure to support the undo/redo commands
-
Alternative 1 (current choice): Use a list to store the history of address book states.
-
Pros: Easy for new Computer Science student undergraduates to understand, who are likely to be the new incoming developers of our project.
-
Cons: Logic is duplicated twice. For example, when a new command is executed, we must remember to update both HistoryManager and VersionedAddressBook.
-
-
Alternative 2: Use HistoryManager (a history of commands) for undo/redo
-
Pros: We do not need to maintain a separate list, and just reuse what is already in the codebase.
-
Cons: Requires dealing with commands that have already been undone: We must remember to skip these commands. Violates Single Responsibility Principle and Separation of Concerns as HistoryManager now needs to do two different things.
-
3.6. [Proposed] Data Encryption
{Explain here how the data encryption feature will be implemented}
3.7. Logging
We are using java.util.logging package for logging. The LogsCenter class is used to manage the logging levels and logging destinations.
-
The logging level can be controlled using the
logLevelsetting in the configuration file (See Section 3.8, “Configuration”) -
The
Loggerfor a class can be obtained usingLogsCenter.getLogger(Class)which will log messages according to the specified logging level -
Currently log messages are output through:
Consoleand to a.logfile.
Logging Levels
-
SEVERE: Critical problem detected which may possibly cause the termination of the application -
WARNING: Can continue, but with caution -
INFO: Information showing the noteworthy actions by the App -
FINE: Details that is not usually noteworthy but may be useful in debugging e.g. print the actual list instead of just its size
3.8. Configuration
Certain properties of the application can be controlled (e.g user prefs file location, logging level) through the configuration file (default: config.json).
4. Documentation
Refer to the guide here.
5. Testing
Refer to the guide here.
6. Dev Ops
Refer to the guide here.
Appendix A: Product Scope
Target user profile:
-
is an insurance agent
-
is always meeting new clients, so needs to manage a significant number of contacts
-
needs to manage a significant number of insurance policies
-
always offering insurance schemes to client base
-
finds it easier to understand visual data
-
prefer desktop apps over other types
-
can type fast
-
prefers typing over mouse input
-
is reasonably comfortable using CLI apps
Value proposition: manages large number of contacts and insurance policies faster than a typical mouse/GUI driven app
Appendix B: User Stories
Priorities: High (must have) - * * *, Medium (nice to have) - * *, Low (unlikely to have) - *
| Priority | As a … | I want to … | So that I can… |
|---|---|---|---|
|
new user |
see usage instructions |
refer to instructions when I forget how to use the App |
|
user |
add a new contact/policy |
|
|
user |
delete a contact/policy |
remove entries that I no longer need |
|
insurance agent |
find a person/policy by name |
locate details of persons without having to go through the entire list |
|
insurance agent |
predefine a custom set of policies |
so I can select policies in this predefined set and make data entry faster |
|
insurance agent |
tag or untag clients |
so I can target people belonging to different target groups |
|
insurance agent |
generate basic statistics and data about my sales for the month |
so I can visualise and keep track of them |
|
busy user |
quickly check what commands are available |
so I do not have to remember all commands of the app |
|
user handling many profiles and contacts |
can use mass operations to change the same details across different people/policies |
so I can speed up my workflow |
|
insurance agent with many clients |
filter and sort people according to their policies and tags |
so I can get information about a particular group of people quickly |
|
user who prefers typing over using a mouse |
interact with all aspects of GUI using commands only |
|
|
insurance agent |
view the key KPIs of my address book |
track my performance |
|
user with not a strong memory |
view all commands as a dropdown list |
|
|
insurance agent prone to making mistakes during manual entry |
I want to be sure that the details of buyers are valid without having to manually check every record |
|
|
insurance agent |
start-up page to reflect key KPIs (e.g: sales in current quarter) |
|
|
insurance agent with many contacts |
disallow creating duplicate profiles |
so I need not worry about accidentally creating duplicate profiles |
|
clumsy insurance agent |
retrieve deleted contacts from an archive of recently deleted contacts |
|
|
insurance agent |
want to see which policies a new contact is eligible for |
so I can quickly check eligible policies while constantly adding new contacts |
|
clumsy user |
I can undo and redo my previous commands |
to amend mistakes made by entering incorrect commands |
|
insurance agent |
I can export the data as an Excel document for easier sharing of data |
so I can generate reports and and send these reports to authorities/other agents |
|
insurance agent |
I can group families who are under the same insurance |
so it is easier to sell/manage plans for these people |
|
insurance agent with new policies |
I want to be able to filter people based on eligibility for these policies |
for faster data entry |
|
insurance agent |
I can have details auto-filled into business/government forms |
so I can save time keying in details I already have |
|
insurance agent |
receive reminders for clients whose policies are almost due for renewal |
so I can contact them to renew their insurance policy |
|
insurance agent |
receive reminders when clients pass a certain age group |
so I can contact them about the new policies that they are now eligible for. |
|
user |
hide private contact details by default |
minimize chance of someone else seeing them by accident |
|
insurance agent who prefers visualisation |
view key performance indicators as diagrams |
|
|
insurance agent with many clients |
configure automatic greeting emails to policyholders |
so I can maintain a good relationship with clients without manually sending individual emails |
|
user with personal preferences |
configure the CLI |
so I can speed up my workflow |
|
insurance agent with many clients |
want to contact my policyholders with ease (such as email) |
so I have a convenient method of communication |
|
busy user |
auto-complete my commands |
so I can perform operations and find the data I need quickly |
|
user with many persons in the address book |
sort persons by name |
locate a person easily |
{More to be added}
Appendix C: Use Cases
(For all use cases below, the System is Insurelytics and the Actor is the user, unless specified otherwise)
Use case: Add person
Guarantees:
-
Person is added even if input fields might be invalid (see 1a).
MSS
-
User requests to add a person.
-
Insurelytics adds the person.
Use case ends.
Extensions
-
1a. Either of the given NRIC, contact number, or email address is invalid.
-
1a1. Insurelytics adds the person into address book.
-
1a1. Insurelytics shows a warning.
-
-
1b. Duplicate profile is added.
-
1b1. Insurelytics shows an error message and will attempt to merge the profile.
-
Use case: Edit person
Guarantees:
-
Person is edited even if input fields might be invalid (see 3a).
MSS
-
User requests to find a person
-
Insurelytics shows details of the person
-
User requests to edit that specific person.
-
Insurelytics edits the person.
Use case ends.
Extensions
-
1a. Person is not found
-
1a1. Insurelytics shows an error message.
Use case resumes at step 1.
-
-
3a. Either of the given NRIC, contact number, or email address is invalid.
-
3a1. Insurelytics adds the person into address book.
-
3a2. Insurelytics shows a warning.
-
-
*a. At any time, User requests to cancel the edit.
-
*a1. Address books requests to confirm the cancellation.
-
*a1. User confirms the cancellation. Use case ends.
-
Use case: Delete contact
MSS
-
User requests to list contacts
-
Insurelytics shows a list of contacts
-
User requests to delete a specific contact in the list
-
Insurelytics deletes the contact
-
Contact appears in the recycling bin
Use case ends.
Extensions
-
2a. The list is empty.
Use case ends.
-
3a. The given index is invalid.
-
3a1. Insurelytics shows an error message.
Use case resumes at step 2.
-
Use case: Assigning a policy to a person
MSS
-
User requests to list persons
-
Insurelytics shows a list of persons
-
User requests to assign a policy to a specific person
-
The policy gets assigned to the person
Use case ends.
Extensions
-
2a. The list is empty.
Use case ends.
-
3a. The given index is invalid.
-
3a1. Insurelytics shows an error message.
Use case resumes at step 2.
-
-
3b. The person is not eligible for the policy.
-
3b1. Insurelytics shows an error message and returns a list of policies the person is eligible for.
Use case resumes at step 2.
-
Use case: Restoring recently deleted contact
MSS
-
User requests to list recently deleted contacts from recycling bin
-
Insurelytics shows a list of contacts
-
User requests to restore a specific contact in the list
-
AddressBook restores the contact
Use case ends.
Extensions
-
2a. The list is empty.
Use case ends.
-
3a. The given index is invalid.
-
3a1. Insurelytics shows an error message.
Use case resumes at step 2.
-
Use case: Merging a duplicate person with different fields
MSS
-
User requests to add a person.
-
Insurelytics indicates that this person already exists and prompts a merge.
-
User indicates whether or not to edit this profile.
-
A different field is displayed and asks the user whether or not to update this field.
-
Steps 3 and 4 repeat until decisions whether or not to merge different fields have been completed.
Use case ends.
Extensions
-
*a. User indicates to stop the merging process.
-
3a1. The user inputs an invalid command.
-
3a2. The Insurelytics indicates an error and prompts the merge again.
Use case resumes at 4.
-
{More to be added}
Appendix D: Non Functional Requirements
-
Should work on any mainstream OS as long as it has Java
11or above installed. -
Should be able to hold up to 1000 persons without a noticeable sluggishness in performance for typical usage.
-
A user with above average typing speed for regular English text (i.e. not code, not system admin commands) should be able to accomplish most of the tasks faster using commands than using the mouse.
-
Should display visual representations as long as Excel is installed.
{More to be added}
Appendix F: Product Survey
Product Name
Author: …
Pros:
-
…
-
…
Cons:
-
…
-
…
Appendix G: Instructions for Manual Testing
Given below are instructions to test the app manually.
| These instructions only provide a starting point for testers to work on; testers are expected to do more exploratory testing. |
G.1. Launch and Shutdown
-
Initial launch
-
Download the jar file and copy into an empty folder
-
Double-click the jar file
Expected: Shows the GUI with a set of sample contacts. The window size may not be optimum.
-
-
Saving window preferences
-
Resize the window to an optimum size. Move the window to a different location. Close the window.
-
Re-launch the app by double-clicking the jar file.
Expected: The most recent window size and location is retained.
-
{ more test cases … }
G.2. Deleting a person
-
Deleting a person while all persons are listed
-
Prerequisites: List all persons using the
listcommand. Multiple persons in the list. -
Test case:
delete 1
Expected: First contact is deleted from the list. Details of the deleted contact shown in the status message. Timestamp in the status bar is updated. -
Test case:
delete 0
Expected: No person is deleted. Error details shown in the status message. Status bar remains the same. -
Other incorrect delete commands to try:
delete,delete x(where x is larger than the list size) {give more}
Expected: Similar to previous.
-
{ more test cases … }
G.3. Saving data
-
Dealing with missing/corrupted data files
-
{explain how to simulate a missing/corrupted file and the expected behavior}
-
{ more test cases … }